Daniella Garcia-Loos
Peter Apps
AP Physics 2 🧲
61 resourcesSee Units
Magnetic Fields
What Makes Something a Magnet? 🧲
If you look around, most of the objects you encounter in your daily life aren't magnetic. This shouldn't be a surprise though, because creating a magnet requires a very specific set of both micro and macroscopic features. To begin with, we've known since the 1920's that a moving charged object can create a magnetic field and become its own tiny magnet. For reasons that we won't get into here, it's primarily the electrons that determine the overall magnetic field of the atom. These electrons can cause natural magnets to occur in elements with half-filled energy levels.
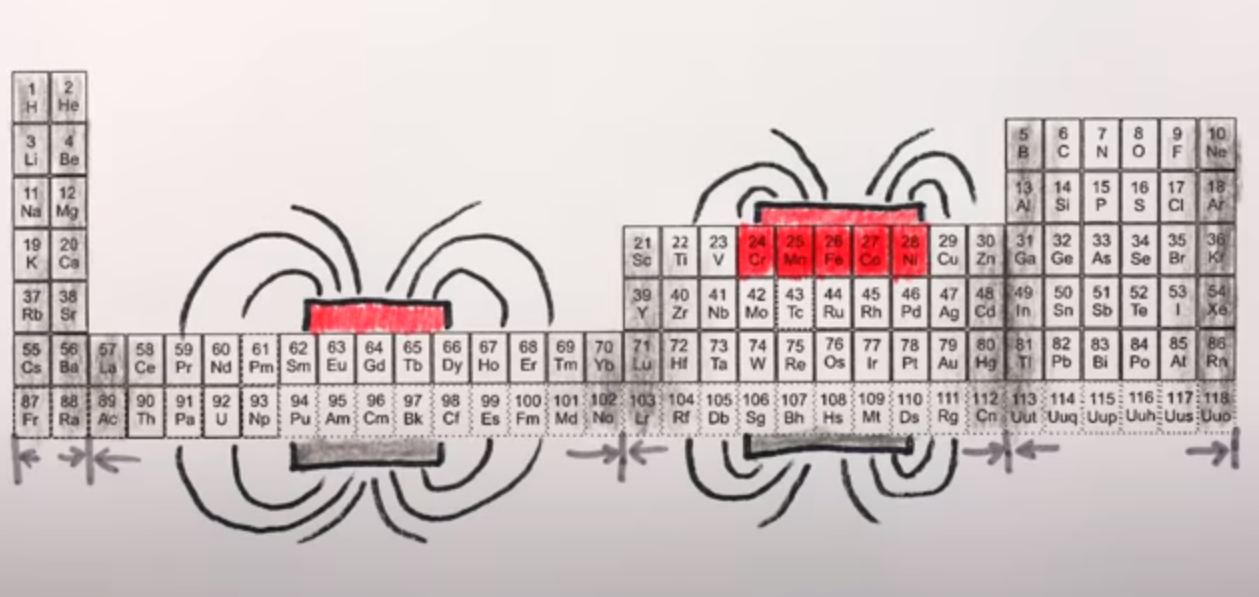
Image Courtesy of Minute Physics
Collections of these elements can create magnetic domains that can align (or be forced to align) to create an overall magnetic field. In the image below we can see an external magnetic field (yellow arrows) can be used to force the individual magnetic domains into alignment which magnetizes the entire material. This is similar to how when a magnet picks up a paperclip, the paperclip becomes magnetized.
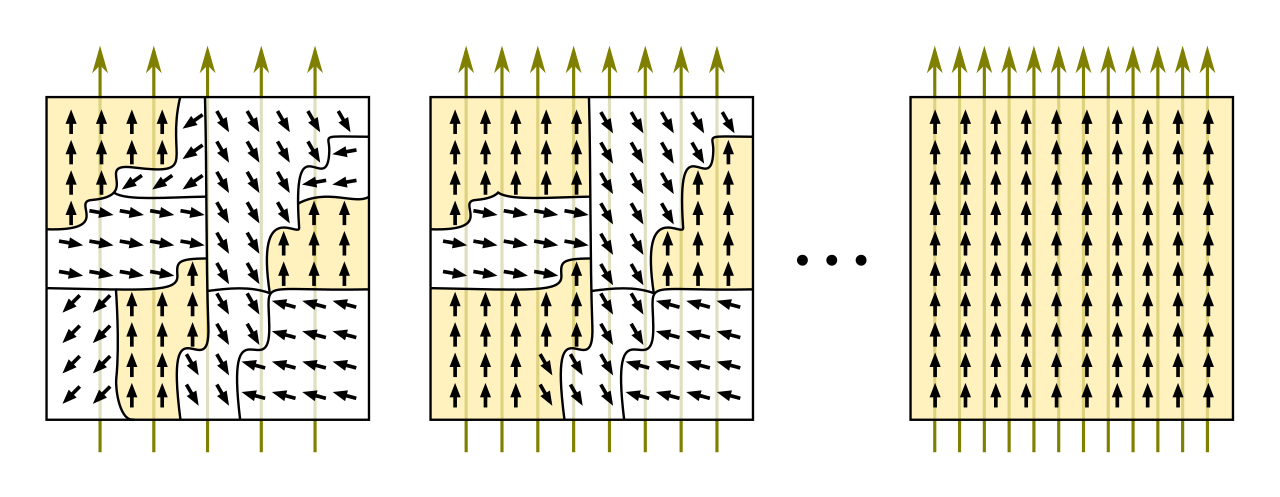
Image Courtesy of Wikipedia
Check out this video by Minute Physics for a great overview of this.
What Does a Magnetic Field Look Like?
You may remember playing with magnets in elementary school, using a compass or iron filings to show the shape of the field. Magnetic field lines show the direction that the north pole of a magnet will be pushed or pulled. Just like electric charges, we can use the rule "likes repel, opposites attract". So, a north pole will repel other north poles and be attracted to south poles. Also, like electric fields, we can tell the strength of the field visually by looking at how close the lines are together.
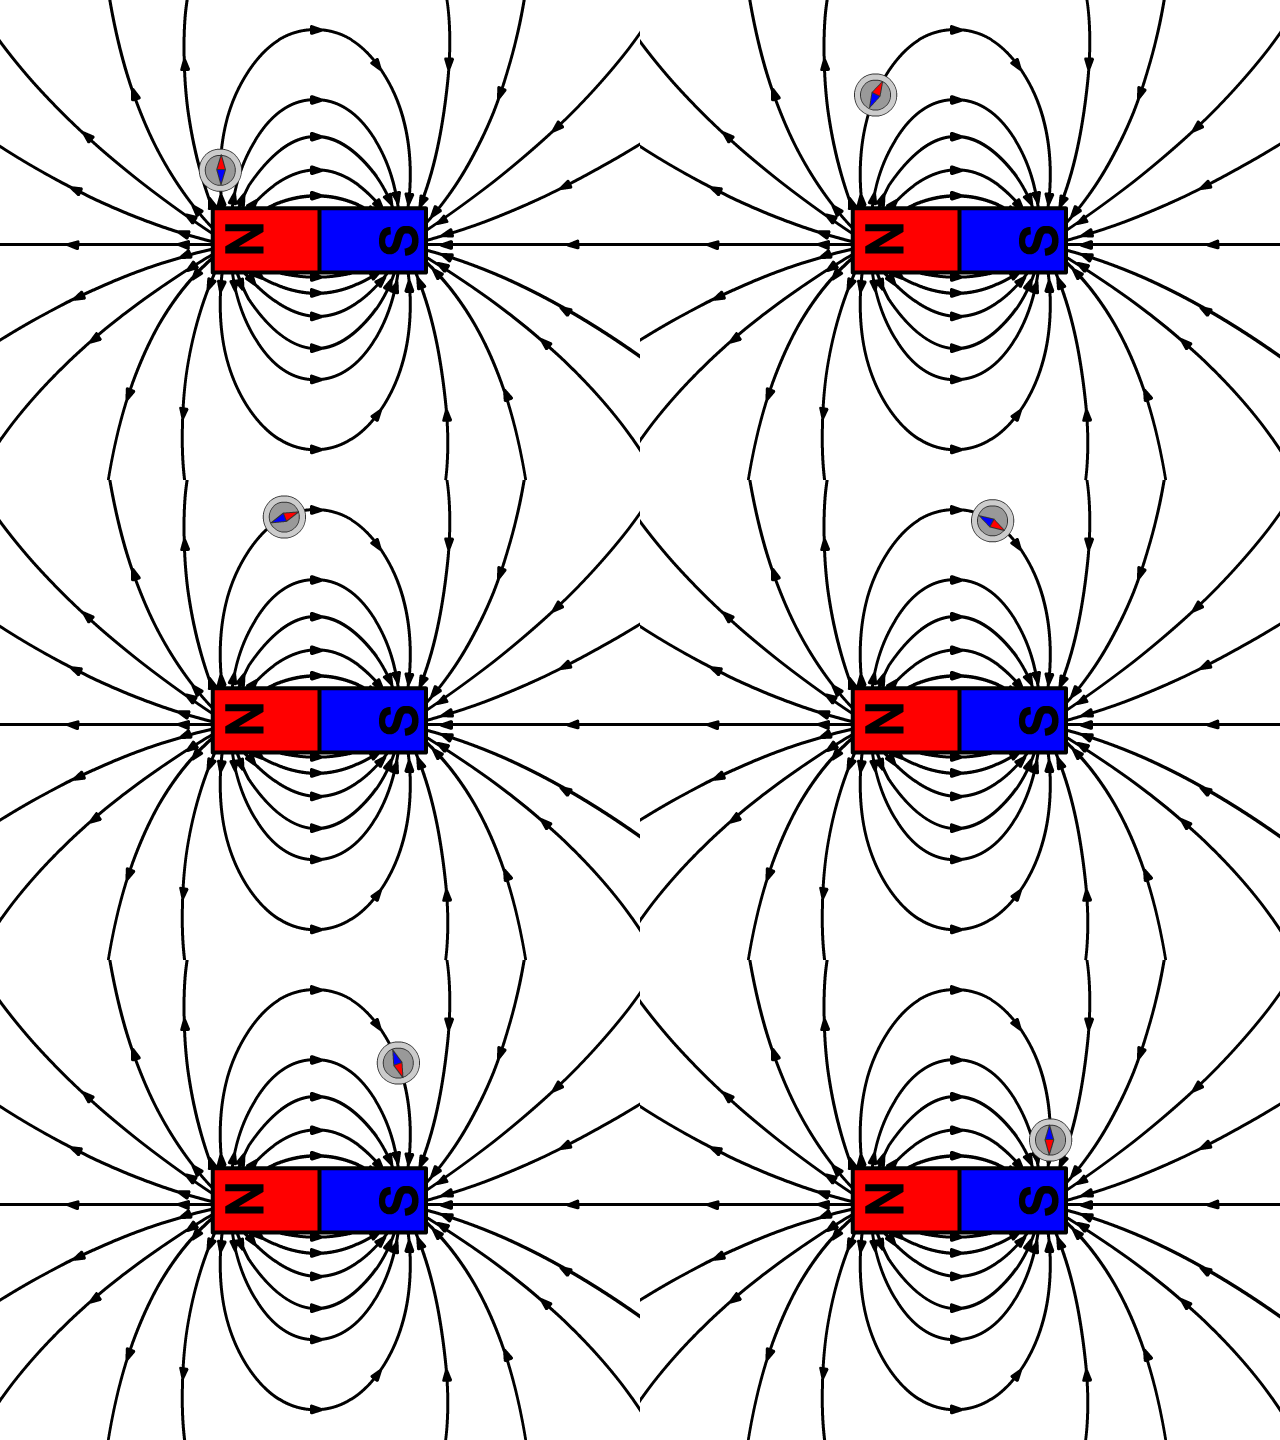
Image Courtesy of stickmanphysics
Here are some key points about how a magnetic dipole can be created:
- A magnetic dipole is a magnetic field that has two poles (north and south) and behaves like a tiny magnet.
- A magnetic dipole can be created by separating the north and south poles of a magnet.
- A magnetic dipole can also be created by placing a current-carrying wire in a magnetic field. The magnetic field will cause the charges in the wire to move, creating a north pole at one end of the wire and a south pole at the other end.
- A magnetic dipole can be represented by a magnetic moment vector, which points from the south pole to the north pole and has a magnitude equal to the product of the pole strength and the distance between the poles.
- The strength of a magnetic dipole decreases as the distance between the poles increases.
- Magnetic dipoles can be used to model the magnetic fields of small magnets and current-carrying wires.
The Earth also produces a magnetic field that protects us from a variety of cosmic radiation. The charged particles from the solar wind spiral along the magnetic field lines and collect around the poles resulting in auroras. In order for this to occur, particles need to be charged to be affected by the Earth's magnetic field.
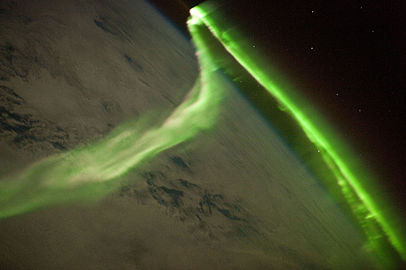
Image Courtesy of wikipedia
Magnetic field strength is represented by B and has units of Tesla (T) where 1T = Ns / Cm. (Aren't you happy we can just write Tesla instead of Newton second per Coulomb meter? I am! 😄)
Magnetic Force from a Moving Charged Particle 🖐️
So, why do charged particles curve in a magnetic field? They experience a force! The force from a magnetic field can be calculated using this equation:

Looking at this equation, we can see that in order to be affected by a magnetic force:
- The object must be charged (q ≠ 0)
- The particle must be moving (v ≠ 0)
- There must be a magnetic field (B ≠ 0)
- The particle and the field must have a perpendicular component (cross product)
For the AP exam, you'll be expected to be able to quantitively analyze these scenarios when the velocity is 0°, 90°, or 180° relative to the magnetic field. For all other situations, we'll deal qualitatively with the outcome.
Ok, so we can calculate the magnitude of the force, but what about its direction? This can be easily found using the Right-Hand Rule (RHR). Point your thumb in the direction a positive charge is moving, your other fingers in the direction of the magnetic field, and your palm will face the direction of the force.
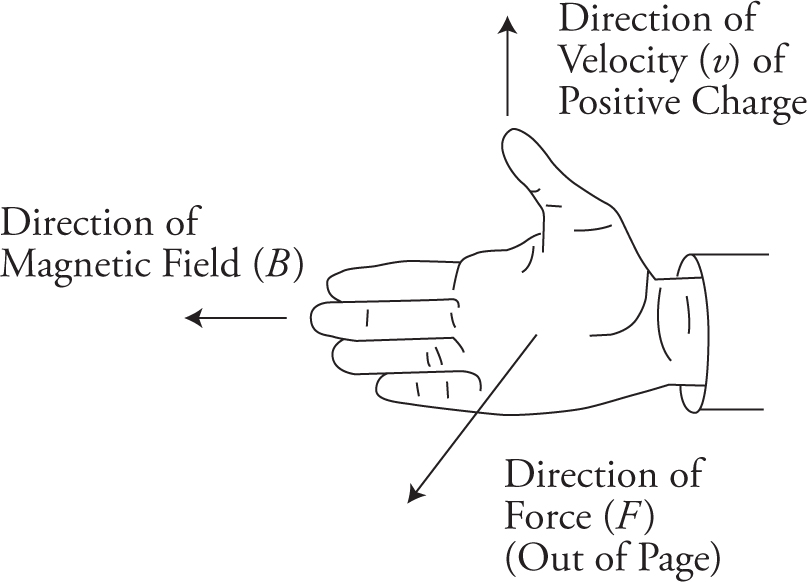
Image Courtesy of schoolbag.info
Note that the RHR tells you information for a positive charge. If you have an electron (or other negative particles) you can still use the RHR, but the force will be facing in the opposite direction (into your palm instead of out of it).
Magnetic Force from a Current in a Wire 🧭
So we've seen that a charge moving through a magnetic field experiences a magnetic force. Let's apply the same concept to a wire and see what happens.
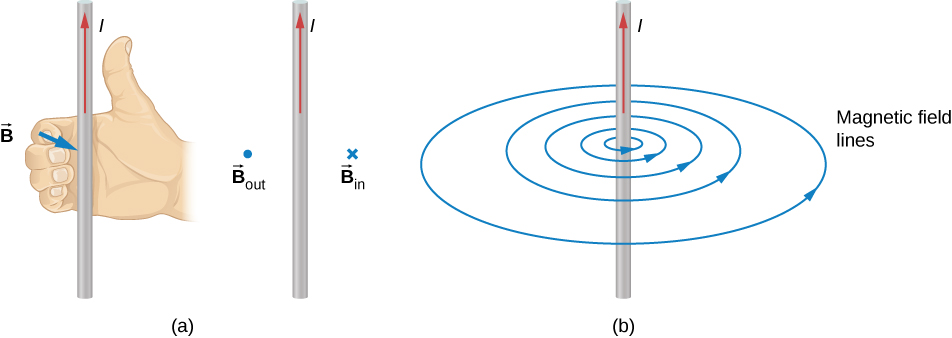
Image Courtesy of cnx
Any wire with current passing through it becomes an electromagnet. The magnetic field lines are circular around the wire radiating outwards. Again, we can use the right-hand rule to determine the direction of the magnetic field. This application will be referred to as the Right-Hand Curl Rule (RHCR) since we now have 2 applications of this rule.
To do the RHCR, you position your hand with your thumb pointing in the direction of the current and curl your fingers around the wire. Your fingers point in the direction of the magnetic field. In the example above, the $B$ field is coming out of the page to the left of the wire and going into the page on the right side of the wire.
The internal magnetic field created by a very long current-carrying wire can be determined using the equation:

I is the current flowing through the wire, μo is the permeability of free space constant (found on the front page of your reference tables), and r is the distance away from the wire.
For a more detailed explanation of how this phenomenon works, check out part 2 of the Minute Physics video series on magnets.
Here are some key things to remember when drawing a magnetic field:
- A magnetic field is a region around a magnet or electric current where the force of magnetism can be detected.
- The direction of the magnetic field at a particular point is the direction that a north pole of a magnet would point if it were placed at that point.
- The strength of the magnetic field at a particular point is related to the density of the field lines at that point. Field lines that are closer together indicate a stronger magnetic field.
- The magnetic field lines around a magnet form closed loops, with the direction of the field given by the right-hand rule.
- The magnetic field lines around a current-carrying wire form concentric circles around the wire, with the direction of the field given by the right-hand rule.
- When drawing a magnetic field, it is important to pay attention to the direction of the field lines and the strength of the field at different points.
- You can use a magnetic field viewer (such as iron filings or a piece of paper with a magnet placed under it) to visualize the shape and direction of the magnetic field.
Practice Questions
1.
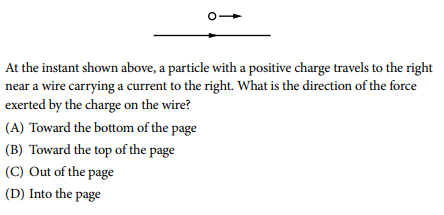
Image Courtesy of the AP Physics 2 Course & Exam Description
Answer
Choice B is correct. Use the Right Hand Rule twice. First to find the direction of the magnetic field around the wire (should be coming out of the page above the wire, and into the page below the wire) then again to find the direction of the force the wire exerts on the charge (should be towards the the bottom of the page). The question asks for the force the charge exerts on the wire which is a Newton's 3rd Law pair with the force we just found. So the wire pushes the charge towards the bottom of the page and the charge pushes the wire towards the top of the page.
2. A negatively charged particle is moving with a speed of vo when it enters a region with magnetic field B directed into the page. The dark curve shows the path the particle moved in the field.
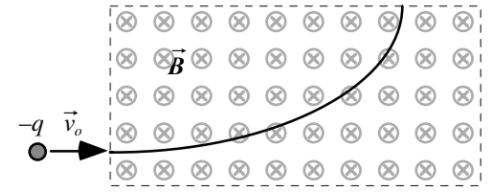
What, if anything, is wrong with this diagram?
Answer
There are 2 major problems with this diagram
- The particle should curve downwards not upwards in this field. The Right Hand Rule gives us a upwards force for a positive particle so the negative charge must experience a force downwards and therefore curve down towards the bottom of the page
- The magnetic force is always perpendicular to the velocity of the particle, so the particle will always move in uniform circular motion and move in an arc (1/4 of a circle) instead of the curve shown above.
Browse Study Guides By Unit
💧Unit 1 – Fluids
🔥Unit 2 – Thermodynamics
⚡️Unit 3 – Electric Force, Field, & Potential
💡Unit 4 – Electric Circuits
🧲Unit 5 – Magnetism & Electromagnetic Induction
🔍Unit 6 – Geometric & Physical Optics
⚛️Unit 7 – Quantum, Atomic, & Nuclear Physics
📆Big Reviews: Finals & Exam Prep
📚Study Tools

Fiveable
Resources
© 2025 Fiveable Inc. All rights reserved.